


Homepage
•
Learning Library
•
Blog
•
Harness the power of 3D models in the classroom
Expand breadcrumbs
- Learning Library
- Blog
- Harness the power of 3D models in the classroom
- Homepage
- •
- Learning Library
- •
- Blog
- •
- Harness the power of 3D models in the classroom
Harness the power of 3D models in the classroom
3D design and modeling might seem like constructs exclusively for video gamers, architects and engineers. But the truth is, 3D concepts are useful in many arenas and are even finding their way into classrooms to teach a variety of digital age skills.
3D models are realistic-looking digital surfaces or objects that are designed by manipulating polygons, edges and vertices in simulated 3D space. 3D models make the intangible seem tangible.
Giving students opportunities to create 3D models keeps kids engaged and excited about learning. Consider the embedded geometric principles of altering the visual perspective of students as they manipulate items within an x, y and z axis.
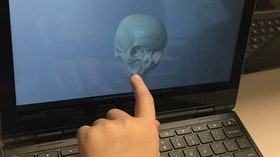
Or imagine the inquiry you could stimulate by putting hominid fossils into students’ hands, allowing them a greater depth of perspective of these real-world items.
3D experiences can also transport students to any location in the world to gain a better geographical perspective of literary settings, world cultures and more.
There are many great resources for using models for instructional use. Thingiverse and Sketchfab offer free models and projects that students can download, share and even print on a 3D printer.
And yet working with 3D isn’t just about finding the ultimate item to share and passively view with students, it’s an opportunity to creatively ignite student learning.
By allowing students to become designers, students can literally take imagined ideas from conception to fruition. This is a key skill called out in the Designer standard within the ISTE Standards for Students.
To get you started, there are a wealth of digital tools that allow students to work on their own 3D designs. Here are a few of my favorites.
Tinkercad. The simple online 3D design interface allows users to manipulate, shape and link geometric shapes in a virtual space to create 3D models. Users can immediately create and download designs as .STL or .OBJ files for 3D printing or sharing. Tinkercad is a great starter tool for anyone interested in working with 3D design and allows for teacher moderation of student accounts.
Mecabricks. The Mecabricks interface is immediately compelling to any user who is a fan of Lego building blocks. Imagine building with Legos on a 3D virtual surface. That’s what Mecabricks is like! Students can place, build and link virtual Legos and save them as .OBJ or .STL files so they can print and share.
Doodle 3D. The appeal of the Doodle 3D tool is its friendly, almost cartoon-like interface offering the ability to create and use non-linear shapes and designs. Doodle 3D allows the user a more customized 3D design experience because they can draw in addition to placing geometric shapes. As with the other tools, users can immediately print, share or download as .STL or .OBJ files.
There are so many ways to take ordinary classroom experiences and make them extraordinary by integrating 3D design. Here are some of my favorite instructional ideas:
Solve real-world problems. Encourage students to find real-world solutions by inventing an item or solving a STEM challenge. Ask students to follow this seven-step process:
- Come up with a product that would benefit society.
- Draw the invention.
- Describe the product’s functionality.
- Fill out a patent request form.
- Use Tinkercad to design the product.
- Write an instruction manual.
- Market the product.
This video compilation shows some of the more ingenious designs that students have made over the years. Students demonstrate the inventive process by conceiving of products, such as food expanders, GPS tracking devices for sunglasses, endless energy engines, kinesthetically charged cell phones, flying vehicles and more!
Create useable cookie cutters. Students of all abilities can participate in the design experience. I recently showed students in a life skills program how to design their own functional cookie cutters.
They found a shape on the internet, such as a holiday bell or tree, and printed it on paper. Next, they traced the design onto a piece of plastic, opened the Thingiverse program and then taped the plastic onto the computer screen so they could use the mouse to retrace the image and save it in the program.
After saving the file on Thingiverse, they used a 3D printer to create the cookie cutter. Students used their products in their Family and Consumer Science class to bake holiday cookies.
Learning in virtual environments. Host a 3D grand slam by uploading student created 3D designs into a virtual environment (OpenSimulator/SecondLife, Cospaces, Metaverse) and allow students to share, interact, conduct a scavenger hunt, explain their design with a digital avatar, or host a virtual art gallery.
Begin by having students design a 3D item. Rather than print the item, save it as an .OBJ file.
Create a virtual “sharing” space. Cospaces is a free virtual environment space that has several types of terrain (a building, a forest, a meadow, etc.) where students can upload 3D designs.
Metaverse is an augmented reality space that features student’s 3D items augmented against the real world location that you are in.
Whatever virtual platform you choose, have students upload their 3D project (.obj files) and ask them to explain/describe/write about the item they created and how it meets the standards you are addressing.
Classmates can view each other’s work and demonstrate their learning with a written reflection, a checklist, a rating system or even a voting schema.
Learn more about how to bring 3D design into any classroom in my ISTE Expert Webinar “Is 3D For Me?” which covers:
- Strategies for implementing 3D models in several subject areas.
- Resources for 3D design lessons and curriculum.
- The process of designing and printing 3D designed projects with students.
- Funding resources and 3D printing recommendations.
Mary Howard is a sixth grade teacher at Veronica E. Connor Middle School in Grand Island, New York. She teaches ELA and social studies and was a finalist for the 2018 New York State Teacher of the Year. Mary is an ISTE Conference presenter and is active with the ISTE’s Virtual Environments Network PLN. She features many of her educational technology adventures and musings on her blog yoursmarticles.blogspot.com. You can follow her on Twitter @mrshoward118.